Showing posts with label baby girl. Show all posts

Monday, December 19, 2011

Baby girl Christmas nightgown.

Like many, I would like to give my kids a cute pair of pajamas on Christmas Eve every year.
Right now since I only have my 1 little girl, I thought it would be cute to make her a nightgown.
I used my baby girl nightgown tutorial found here.
Except of course made it a bit bigger.
I also sewed a small strip of lace right around the middle.
I then decided to make a matching bow using this tutorial.
I love how they turned out and I can't wait to see her in it!


Happy sewing!


Pin It

Saturday, November 5, 2011

Play make-up for little girls.

So I have no idea where on pinterest I saw this.
But I saw a picture similar to the one below a while back.
My little girl loves makeup and gets so excited when I start putting mine on.
So I decided I should make her some of her own.

First, I bought the cheapest nail polish Wal-mart had.

And then I poured it into a old make up container.
I let it sit overnight.
It hardened.
And now my little girl has her very own play makeup!
She loves it.


Pin It

Tuesday, November 1, 2011

Little bunny fufu.

For Halloween this year our family was the little bunny fufu group.
The field mouse, fairy, and of course little bunny fufu.
Olivia's hat was made by my great grandma.
Her tutu was made by me.
Quite simple but a bit time consuming.
There are quite a few tutorials out there on how to make one.
A friend of my mom's showed me this one.
All I did was buy some elastic, measure it around her waist(or where I wanted it), and then cut it 2 inches smaller than what she measured.
I sewed the elastic so it was a circle.
I bought 9 yards of white tulle.
Cut it in about 6 inch strips and tied them onto the elastic waist.
Really close together.
That's it.
They really weren't even cut straight and some were longer than others but I just trimmed up the bottom at the end and you really can't tell.
I made her little cotton ball tail from this tutorial here.
Except I stopped after the yarn ball was made of course.


There ya go, a little bunny fufu.


Pin It

Wednesday, October 12, 2011

Baby girl nightgown:

These are seriously the cutest and most comfortable little nightgowns ever.
My sweet aunt taught me how to make them when I found out I was having a girl.
I couldn't believe easy they were to make.
My baby girl wore them until she was like 5 months old.
She's a bit small, but generally they last for about 3 months.
I love how long they are-keeping their little legs covered and making it easy for the constant diaper changing.
NO snaps and stuff.
Plus I love the little mittens on the onesie at the top of the nightgown.
Plus you can pick your fabric.
I ordered mine off of fabric.com
Love that place.
Here are some pictures of my Olivia in a few of hers.

This one is flannel so it is extra soft and warm.


Okay here is how to make them.
I posted a DIY ruffle dress a few posts ago with a step by step process on what to do.
So for the most part we are going to be following that.
http://precioussparemoments.blogspot.com/2011/10/diy-onsie-ruffle-dress.html
You will need:
A sewing machine
Matching thread
3/4 yard fabric
a size 0-3 month onesie. (I just bought the packs of 3 with mittens)
And about 1 hour worth of time!
So cut your square of fabric out.
26 1/2 inches wide and 22 inches long.
Make sure that when you fold it hamburger style that it is plenty long.
Now follow the exact same steps up to the gathering part.
At this part the only thing that is different is that you will want to gather the fabric more, so that the waist is smaller.
If you have another newborn dress or you have your baby right there just hold it up to them and gather it to about the same size!
Keep following the same steps.
When you finish sewing the onesie on and have cut the extra fabric off and zigzagged around the edges. Flip it right side out and of course begin admiring.
If you like the length then don't worry about cutting it, if you want it a tad shorter then just cut the extra fabric right off.
If you do cut it you will want to zigzag around the bottom of the dress again.
Now I love this part because it just puts the finishing touches on this way cute nightgown.
Fold the bottom of your nightgown in about 1/2 inch-1 inch.
Iron it all around so it stays folded.
Now pick a cute stitch on your machine.
You may have to change the foot.
And sew around the whole bottom.
See below for pictures.


Make sure you cut off all the random strings.
And that's it!
You have your very cute, cozy nightgown that I promise you won't regret making.
Let me know if you have any questions!

Pin It

Tuesday, October 11, 2011

Diy Onesie ruffle dress:

So my sweet aunt taught me how to make these darling onesie nightgowns for newborns.
I'll eventually get to posting how to make one of those!
And since my baby girl isn't a new born anymore I decided to do pretty much the same thing except for add some ruffles at the bottom and of course make it more of a dress rather than a nightgown.
So here we go.
Lots of pictures and instructions.

Buy some cute fabric.
I bought 3/4 a yard for the actual dress part and 1/4 a yard for the ruffles.
It just depends how many ruffles you want. I did 4 layers I think.

Buy a onesie or use one you already have. (Lightly used)
My little one is a bit small for her age so I used the size 3-6 month.

I used one of her current dresses to measure out the length of the dress.
So if you lay the dress out face up on the fabric, I usually add about 2 inches in width.
And cut.
It doesn't have to be perfect.
Just a nice sized square.
See below.

Now you are going to want to do a small zigzag stitch all around the edges.
If you have a serger that would work perfect.
But if you have no money like me, the zigzag stitch will work great!

Make sure you do it on the very edge of it so that you are sort of singeing up the sides.
This step just helps make things look nice.

Then you are going fold the fabric hamburger way, NOT hotdog way, putting right sides together and sew straight down the edge. Make sure you just use a regular stitch not zig zag.
Use between a 1/2 inch to 1 inch seam.
Iron the seam open.

Cut your onesie.
I like to leave about 1 inch below the sleeve.
But whatever you want!

Choose a side of your fabric to be the top and sew a basting stitch around it. I changed the stitching size to 4.5. I also used about a 1 inch seam. Make sure you leave extra thread at the end so that you can pull it to gather.
NO back stitching on this part!!

Pull both strings to gather the fabric to the size of waist you want.
I do a little at a time and move the fabric as I do it.
Try to make the gathering equal all around.
Don't pull too hard or you might break the strings and then you will just have to redo the basting stitch.
No worries if you do though. I've done it tons.

Now, place your little onesie upside down in your fabric with the back of it lined up with the back of the bottom fabric.
(Where your seam is)

Like this!

Pin it.
Not too many pins I usually just put one on each side and one in between.
Whatever works for you.
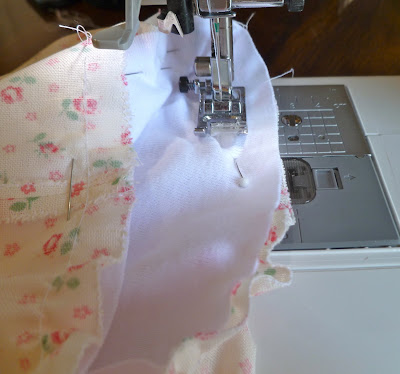
Use a regular sized straight stitch and sew around the inside of the dress. I used a 1 inch seam. Make sure you pull your pins out.
And DO NOT pull the fabric tight, it will ruin the gather. Just sort of follow along helping keep things gathered.

Then, cut off any extra fabric on the edge. Don't get too close or worry about it being straight.
I promise it doesn't matter.

Now zigzag around the edges like we did in our very first step. Just so the edges look nice.

Flip it right side out and look what you have!
Oh ya if it is too long just cut the fabric to the length you want.
And then zigzag around the bottom of your dress.

Now for the ruffles.
Cut your strips of fabric.
I did about 3 1/2 inch strips.
Zigzag around all sides of the fabric.
Do a basting stitch along the top of the strip and pull to ruffle.
Pin it on the dress where you want it and sew over the basting line.
That's it.

I sewed mine pretty much on top of eachother but you can do what you want!


Isn't it so very cute?

This was just my experimenting dress so I'm so excited to try more!
You could even do ruffles all up the top of the waist.
It might take a while but it would be darling.
Feel free to ask any questions.
I'm sure I can be a bit confusing.


Pin It